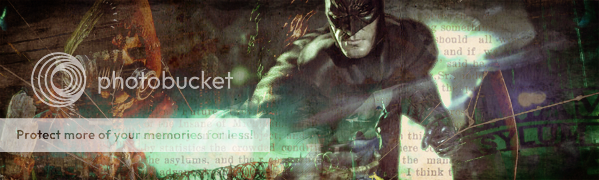
So people have asked me how I make my graphics, things like this --->
/balto/en/view_fanimage/Ionday_Miracle_in_Me/246.html&numart=12847&display=30I finally decided to make an image so here is the process of making my latest image.
Step 1
First off, you need inspiration. Never start something out without having an idea of what you want the outcome to be, what moods and themes are meant to come across. I tend to use songs for inspiration.
Saying that don't feel too restricted either. Give yourself a starting point but never be afraid to experiment.
Step 2
Here's a little bit of personal advice, for all my graphics I start out with a landscape background. I normally tone down the saturation and brightness but I feel at the end it's a quick way to get an even and simple looking background.
Step 3

So now you should start adding the screenshots that you want. I used to use pixel select to drag the part of the image I want over, but I find it too fidly now so I would suggest bringing the whole image over and erasing what you don't want. When erasing there's no specific brush to use, if you want a gradual, soft and subtle effect use a blurred edge one. For an image to stand out more go along the edges with a simple pen tool. Never use the pencil erase tool.
(If going for a feathery subtle look I suggest blowing out the borders so the size of the image makes no difference.
Step 4

Now you should start editing. Try to keep what you do to a mimimum unless you are deliberately going for that sort of look. Contrast tool is your friend. If you want to change colour I wouldn't change the hue unless it's only slightly, otherwise it seems out of balance.
Changing the oppacity of the image makes a huge difference to the overall feel of a graphic.
Resize to what you want it to be and play around with composition.
(To make it appear more original why not mirror the image.)
Step 5
Things are fairly repetitive from here on. Repeat steps 3 & 4 with other images you wish to feature.
Step 6
Make some things more visible than others and DON'T BE AFRAID TO CHANGE! Don't feel anything is set in stone, this is the joy of digital editing.
Step 7
Persevere
Step 8
Once you're happy save what you have as a jpg and continue editing using this.
Step 9Add texture effects and play around with your layers.
(I highly suggest dupplicating layers so you can try out more things on them and then tone down the oppacity)
Step 10
Finishing touches!
And Voila