A lot of you guys have asked me how I render, so I figured I'd make a tutorial. Keep in mind, there's no "right" way to render, but (providing you have the right programs) I think my way is easier.
I've been using MS Paint for a while and this is what I use mostly for my drawings, but for images we're also going to use GIMP. If you don't have it, you can download it here
http://www.gimp.org/. It's a free program and its worth the extra ten minutes of sitting there waiting for it to install.
MAKE SURE YOU SAVE YOUR WORK OFTENStep 1A: Selection and Cropping KIrada's tutorial pretty much has this covered. If you haven't read it yet, go have a look viewtopic.php?f=13&t=21585
Step 1 B: Preparations Cat's tutorial explains this. I use the same method of increasing the image before rendering and decreasing after its done
viewtopic.php?f=13&t=25070
Now we can get started.
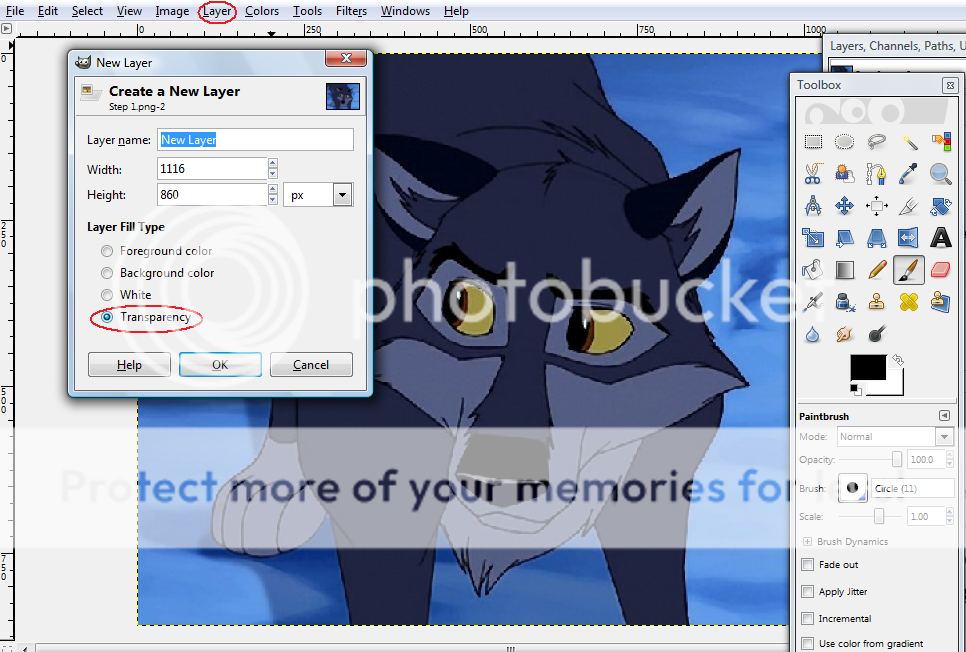
NOTE: Make sure you keep a window open of the original file. You'll find out why later on.Step 2: GIMP Now what I do, is open the file in GIMP and add a new layer to it by going to Layer at the top, and clicking new layer. Make sure this one's transparent! That's important.
 Step 3: Line Art Preparations
 This part's really easy. Click the black square and choose a lighter color ( I usually use red) and take the Pencil tool and trace over all of the lines you want to use for your render. It's ok if your lines are a little thick or messy. We'll be correcting that problem later in Paint.
 Step 4A: Filling it all in
Once you have all the lines you want traced, fill everything in white by clicking the little arrow tool and switching colors and then filling in your lineart with white INCLUDING THE BACKGROUND.
 Step 4B: Delete the Background Layer
This is very simple. Right click on the layer that says 'Background and hit delete layer. Simple as that. When you've done that, save your picture and reopen it in MS Paint IN A NEW WINDOW. DO NOT OPEN IT IN THE SAME ONE YOU HAD OPENED IT THE FIRST TIME. You need the uneditted screenshot.
 Step 5: Lineart
What I do here is take the curvy line tool and use it to outline the lighter lines in black.
 Step 6: Cleaning Up
Using the eyedropper tool, click on a lighter colored area. Then using the paint bucket tool, fill in all the white. When youre done filling in the lineart with color, right click all of those spaces. It should fill them in with white and you'll be ready to color it in.
 Step 7: Coloring it in
Again, I look back on Cat's tutorial for this part. I stretch out my canvas and paste and already finished picture in the white section of the character I want to render.Then I use the eyedropper tool to pick the colors I need for my character.

For the markings, I use the curvy line tool. It's quicker than the pencil tool and the effects are prettier x3
 Step 8: Putting the Background Back
After saving in MS Paint open your file in GIMP again. Use the Fuzzy Select tool and click on a white space behind your character. Remember what I said earlier about keeping an uneditted copy of your original screencap? Well here's what we're going to do with that! Copy the picture and right click the space you selected. From the drop down menu, go to Edit and Paste Into. This will paste the background into your image and leave your character completely untouched. If you didn't keep the original screencap on hand, don't sweat it. You can use another background.

Kepp using the fuzzy select and pasting the background into the image until it's completely filled in.
 Step 9: Finishing Touches
Once you're done with your background, open your image in paint again and shrink it down. The lines will look cleaner and it will look more like it came from the movie instead of a screencap you colored over.

Now you're done. And this is how I do my renders. It's a fairly simple technique, but it gets the job done. I hope I helped some of you guys out and feel free to ask me any questions if you have any difficulty if you use this method ;P
Grey (c) Wicked_Innocence


